Category Archives: techniques

Burning Un-love

Burning Un-love

I was so excited to open up the Hot Boss today. A bit nervous too. I’m a klutz. Getting hurt was definitely an option. Did you know scrapbooking is a dangerous activity? It is, trust me!

Before plugging in the Hot Boss, I did some prep work and taped off an area of a test paper to work on, and covered the desk with the ranger craft mat to protect it from escaping embossing powder and piping hot tools.

IMG_0671

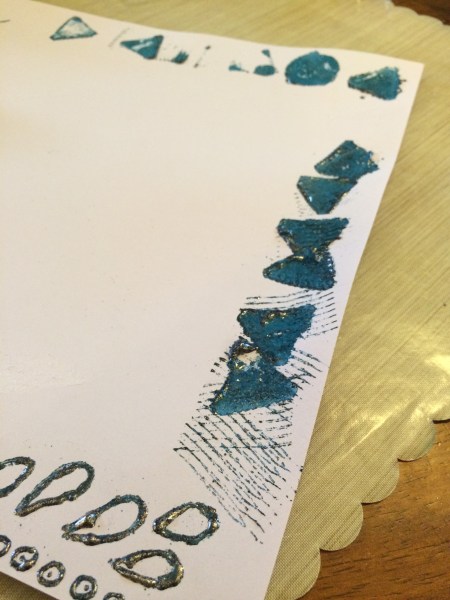
The plan was to doodle a border around the outside of the page. First I spread a layer of embossing powder around the edge of one side of the paper, and then started drawing in the powder with the Hot Boss.

IMG_0673

Not much of a fan so far. The tool didn’t melt the embossing powder very fast, so drawing each shape took forever. Additionally, the embossing powder kept sticking to the end of the tool, making it difficult to see what was actually melting on the page.

IMG_0672

Be careful around this thing, it’s HOT!
After shaking the excess embossing powder back into the jar, I used a heat gun to smooth out the lumps and bumps.

IMG_0675
So far, so meh.

Next I tried the rake tool. That had looked like fun in the videos. Yeah.
IMG_0678
You know what I ended up with? A rake tool covered in embossing powder. Maybe I didn’t let the tool heat up enough. Maybe I used too thick of a layer of embossing powder. Maybe I just need lots of patience and practice.
IMG_0676

The last thing I tried was using the long knife attachment to create dots and lines. That one actually became fun. Because you dip the tip of the attachment into the embossing powder pot, when you pull it out, you can watch the embossing powder melt and start to move. That made it easier to control and work with. The shooting stars are what I created with the knife tip.

Here are all three tips together. I definitely preferred using the knife tip. But, there’s one more thing!
IMG_0680

This!

IMG_0681

What’s that you say? Why that is a bead of embossing powder that dripped off the end of the tool. Just imagine doing that on purpose, on a sheet of parchment paper. Homemade enamel dots! This just put the Hot Boss back in the keep pile.

So what do you think? The Hot Boss seems to have a steep learning curve, but some serious potential. Plus I could always just start learning wood burning, right?

What do think? Do you want to try out this tool, and see what kind of results you get? Do you have this already and love it? Inquiring minds want to know!

Free Wheelin’

Free Wheelin’

Today, we’re going to be looking at the results of finally opening up the Memory Essentials Get Rollin’ package.

What’s inside?

A green-handled, clear wheel with a layer of sticky stuff (that’s the scientific term) covered by a piece of plastic. The plastic acts as a cover to keep random things from sticking to your wheel before you’re ready to use it, much like the covers on the cutting mats for the Cricut or Silhouette.

Once you take off the plastic cover you can add any unmounted stamp you like to the wheel. A not necessarily obvious caveat–you want your stamp surface to be even, so try to choose stamps with similar thicknesses. You wouldn’t want to use a thin rubber stamp with one that’s got a foam cushion on it. You’ll end up with missed spots on your final project.

I started out with a stamp set from Fiskars’ Heidi Grace line, with a single border stamp and a word and flourish. After inking it up well, I rolled the wheel across a piece of smooth white cardstock.

IMG_0669

If you’ll look closely, you’ll see that there’s a definite line where the top layer of ink transfer stopped, and only residual ink made it onto the page. This is a 12×12 page. An 8.5×11 page would probably not run out of ink like this page did.

IMG_0668

I tried again, this time using a pigment ink instead of a dye ink. No appreciable change in transfer clarity, but I definitely was having trouble keeping the wheel straight up and down, and stamping complete images. That’s how I knew it was time to stop making things last night. Another thing done, to minimize that annoying change in ink amount, was to switch the starting sides for each roll of the wheel.

IMG_0670

Finally, this morning I tried with some flower stamps from Close to My Heart, and a tricolor stamp pad from Brilliance. Once again I switched starting sides for each roll of the wheel. There’s a little over lapping here, but all in all, not a bad background.

Any ideas on what to make with any of these papers? Feel free to suggest something in the comments. I think I’m just going to sit here staring at them for awhile.


Glitter Conundrum

Glitter Conundrum

I have a glitter conundrum. I am not a big fan of it, but I love it. Yep. Love it and hate it, that’s me.

Let’s talk pros and cons of glitter for a minute, shall we?

Pros

  1. Makes everything bright and happy
  2. Adds a little bit of elegance and/or whimsy to your crafty creations
  3. Comes in every color under the sun
  4. Easily adds visual texture without bulk
  5. Easy to add to projects
friendly glitter || noexcusescrapbooking

friendly glitter

Cons

  1. Sticks to everything
  2. Difficult to contain, aka likes to escape when adhering to projects
  3. Rubs off of “finished” surfaces (think glitter paper)
  4. Can be a health hazard (really!)
  5. Increases the time it takes to finish a project
not so friendly glitter || noexcusescrapbooking.com

not so friendly glitter

There are certain glitter products that I love and don’t want to do without. (Stickles is the first that comes to mind.) There are other products I can live without, even though I have some in my stash. (Pots of glitter from superfine to chunky)

Since I have boys, coming up with ways to use glitter is sometimes problematic. We’ve used it to embellish ornaments and create celebratory pages. Luckily, one of my boys is into all things crafty, which means he comes up with ways to use up glitter, and would love it if more ended up in the craft room.

Also, I have nieces, which makes making pages embellished with glitter more reasonable, especially if the page is about their love of princesses or dress up or superheroes. Of course, my brother-in-law hates glitter with a passion, which somehow gives me more pleasure when I send a glitter laden page about his daughter his way. I am a terrible person.

So, what do you think about glitter? Love it, hate it, or hopelessly confused like me? What are your suggestions for using up glitter? (After all I’ve got a ton, and it needs to get out of my stash!)

I’ll show you some of my favorite ways to use glitter next time!

Retail Inspiration

Retail Inspiration

My mother and I have been doing some mall walking while waiting for the weather to break. I haven’t been to the mall in a while, so was interested to find window displays that echo some of the trends we’re seeing in scrapbooking. Most notably the gold foil trend:

IMG_0291

This was too cute not to try to recreate myself. After digging out a couple of batches of Making Memories butterflies, and punches from Martha Stewart, EK Success, and Fiskars, the background came together fast.

IMG_0386

A few items of note: mirror cardstock works well as a substitute for gold foil. It’s so bright and shiny and happy, don’t you think? Also, I accidentally reverse punched a gold script love. Rather than tossing it, I paired it with a correctly punched love, and made a rorschach blot butterfly that way. At least that’s what I kept telling myself while punching a couple more in different colors.

It was hard covering up the background with photos, but I went ahead and did it anyway.

metamorphosis || noexcusescrapbooking.com

The journaling is on a pull out tag behind the large picture. After initially cutting out the title letters with my silhouette, I debated cutting them larger, but then decided to just use what I had already made. No over-thinking going on over here.

This was a clear case of the product (aka all the butterflies) influencing the topic of the page. These pictures are of my eldest, from the past three summers, and shows the subtleties of how he’s changed and remained the same as he’s grown. Sometime this summer, I’ll have to take a picture of the two of us back to back. He’s just barely taller than me now. He’ll probably be even taller by then.

Metamorphosis indeed.

If you want to make something like this, here are some supplies you could use: (affiliate links)

A Little Splat

A Little Splat

I don’t know about you, but I love a simple technique.

IMG_0362

It’s so much fun to play and find something fun and interesting, if a little violent and messy. Even better is when you can adapt an inspiration piece to different supplies.

I’ve loved the crayon art paintings I’ve seen on Pinterest for ages. (There are even tutorials, check out this one!)

How-to-make-melted-crayon-a

Rather than melting my son’s crayons, I played with distress stains.

IMG_0364

A few vigorous pounces of each color later, and voila! A card that calls to mind the crayon art, without the heat gun or time commitment.

Would you like to see how to do this? How about a quick video?

And a close up of the card for you:

IMG_9476

What’s your favorite technique? Link up a picture or video, and share!